Creating a successful Internet of Things (IoT) product requires many moving parts – from physical devices in the field to the cloud services in a data center – all working together in harmony. Most IoT product ideas will require custom embedded firmware and a web application to accompany the device. What is the best way to bridge the gap between these two vastly different areas of software?
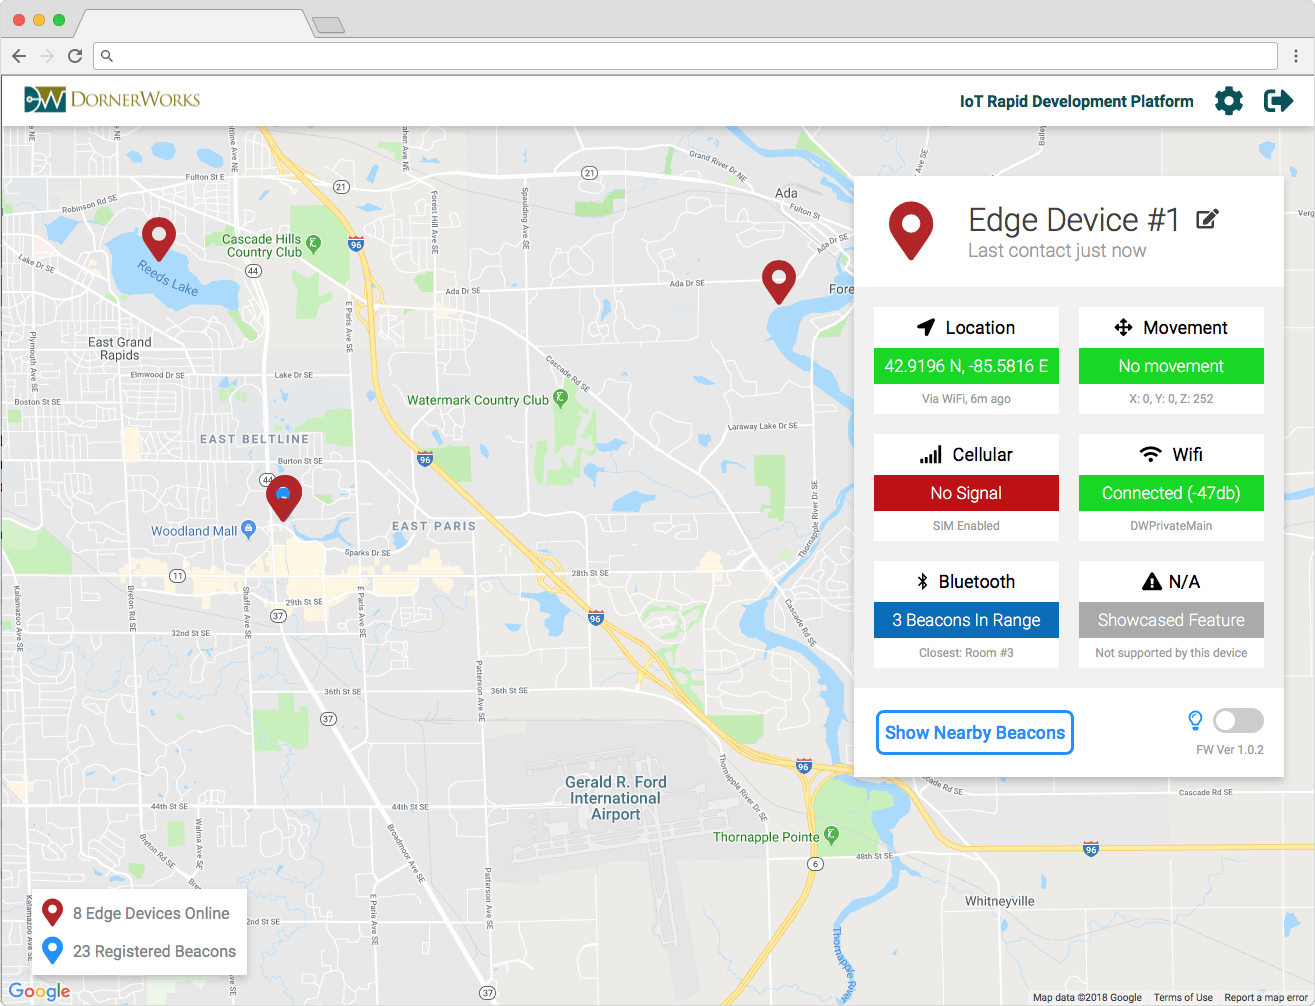
As an intern, I was recently tasked with building a demo IoT product using the DornerWorks IoT Rapid Development Board, a low cost connected prototyping device, as the edge device. The demo included five embedded edge devices sending their current status information (network connectivity, current GPS location, 3-axis Accelerometer data, nearby iBeacons, and more) to a central location. A web application then displayed the devices on a map and provided some controls that would send commands to the device.
On the surface, the demo concept seems simple enough, but even the simplest IoT idea can turn into a daunting task when it comes time for implementation. Real world microprocessors have limitations to what they can do. Real world devices go offline, have slow or intermittent networks connections, and need to be secured from bad actors. All of these factors must be taken into account when designing the communication system between the IoT device and front-end web interface.
Let’s take a look at some of the technologies I used and examine the system architecture I created to address some of these issues.
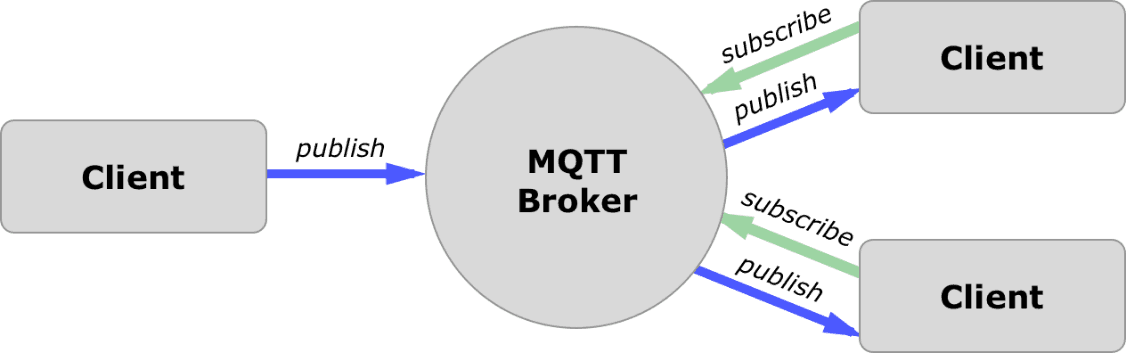
What is MQTT? MQTT is a lightweight publish/subscribe type protocol built on top of TCP/IP, which makes it a natural fit for the Internet of Things. It was designed to use minimal CPU processing power and can provide reliable communication on the flakiest of networks. The “pub/sub” model allows for any number of devices to communicate with each other by connecting to a central “broker,” while only receiving the messages they are interested in. Due to this, MQTT scales easily.
MQTT “topics” are essentially channels that related data travels on. For the Rapid Development demo, I chose to create two new topics for each device, a status topic and a control topic. Each device used a unique UUID to identify itself within each of its two topics:
With the firmware for the IoT devices in place, I turned my eyes to building the web application.
The technologies I used for the web side of things are fairly run-of-the-mill: Ruby on Rails as a web framework with jQuery to help create the front-end. The majority of the work came down to writing the JavaScript needed to make the front-end work.
I knew I wanted the front-end website to access a RESTful API to get the device data, an industry standard way of retrieving data on demand via HTTP requests. In contrast, solutions do exist that allow you to include a MQTT client directly in the front end code–as MQTT implementations for JavaScript do exist. However, consider the following situations:
Creating a basic RESTful API using Rails is fairly trivial so I won’t go into it here, but how did I actually get the data from the devices?
What is Rake? Rake is a build language similar to Make or Ant, but for Ruby. Among many things, Rake allows users to specify tasks with prerequisites. Since I was using Rails to build my web app, I already had Rake installed and ready to go.
I created a mqtt.rake file in the lib/tasks folder for my shiny new Rake task, using the following structure:
 namespace :mqtt do
  desc "Listens to the MQTT Broker and updates ActiveRecord"
  task listen: :environment do
    client = MQTT::Client.connect("[YOUR CONNECTION STRING HERE]")
    client.subscribe('/iot/device/#')


    client.get do |topic, message|
      if topic.start_with?('/iot/device/') then
        guid = topic[12..-1]


        # update ActiveRecord models here...
      end
    end
  end
end
After a little effort, I was able to parse the status information from the devices (which I had conveniently been publishing in JSON format) and update my database records accordingly. I could keep my RESTful API updated simply by running rake mqtt:listen on the command line and forgetting about it.
“How to deploy a rails app to production,” or any web application for that matter, could be a series of blog posts in and of itself. For the record, I used Phusion Passenger with Nginx integration mode running on an Amazon Web Services EC2 t2.micro instance as my production environment.
The Rake task I created also works in production after one more addition. I needed the task to start separately from the web server and to start when the AWS instance started up, so I created the following Upstart script and put it in /etc/init/:
start on started network
stop on starting rcS

env PATH="/usr/local/rvm/gems/ruby-2.4.0/bin:/usr/local/rvm/gems/ruby-2.5.1@global/bin:/usr/local/rvm/rubies/ruby-2.5.1/bin:/usr/local/rvm/bin:/usr/local/bin:/bin:/usr/bin:/usr/local/sbin:/usr/sbin:/sbin:/opt/aws/bin"
env RAILS_ENV=production
chdir /path/to/rails/app/root


script
        rvm use ruby-2.5.1
        export OUTPUT="$(ps aux | grep emqttd)"
        until [[ $OUTPUT == *"emqttd@127.0.0.1"* ]]; do
            # wait for EMQTTD to start
            sleep .5
            export OUTPUT="$(ps aux | grep emqttd)"
        done
        sleep 1
        echo "Executing MQTT Rake Task." /path/to/rails/app/root/log/production.log
        bundle exec rake mqtt:listen >> /path/to/rails/app/root/log/production.log 2>&1
end script
The Upstart service waits for the EMQTTD service, our MQTT Broker, to start up and then executes the mqtt:listen Rake task. Depending on your situation, you may want to have this script run bundle install or rake db:migrate to ensure the MQTT task is fully ready to go.
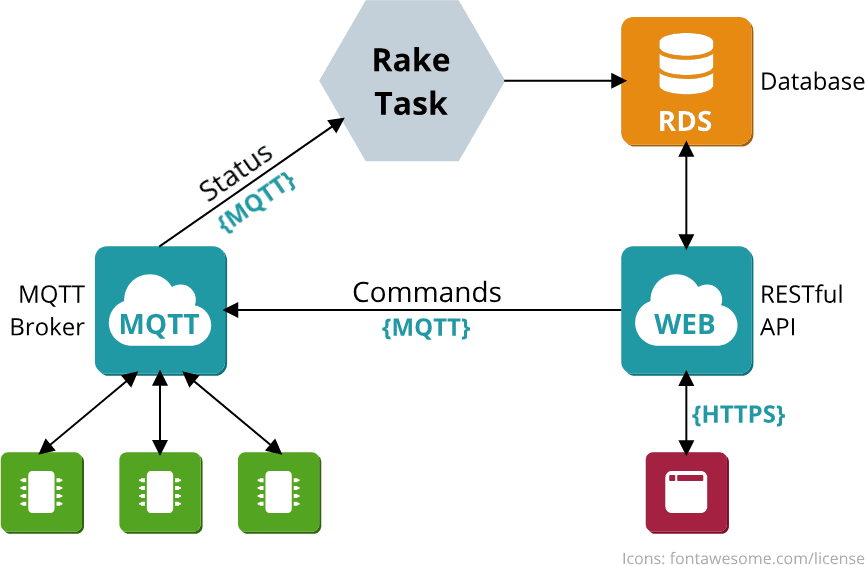
And that’s it! My IoT devices were now sending data to the cloud, and the front end web app could access the live device information using a RESTful API. This is what the finished system looks like:
While the overall system architecture I implemented is satisfactory, there is still room for improvement. In particular, I was not happy with the Upstart script. I found it to be prone to issues when deploying updates to the production Rails app. Since it got the job done, I stuck with it. If I had it to do over again, perhaps I would have looked into Resque, a Redis-backed Ruby library for creating background jobs, created by GitHub to manage the background tasks they need to run in production.
While wrapping your head around all the different components in an IoT product can be challenging, following this approach to getting all of the components connected is a great step in the right direction. DornerWorks has the experience in developing all kinds of IoT products, and our knowledgeable staff is eager to bring your next IoT idea to life.