Utilize Robot Framework for Hardware-In-The-Loop (HIL) Testing
To better describe how robot framework can be utilized for HIL testing, we will do a step-by-step walkthrough of developing and running tests for Linux running on a Raspberry Pi (3b).
All of the code used in this tutorial can be found at https://github.com/dornerworks/robotframework-tutorial.
Setup
First we need to setup the raspberry pi and the host system.
Raspberry Pi setup
Perform the following steps to setup your raspberry pi:
- Install raspbian to your SD card following the steps here.
- We installed
2020-02-13-raspbian-buster-lite.img
- Username:
pi - Password:
raspberry
raspi-configsudo apt update
sudo apt install sysbench
sudo apt install nginx
sudo /etc/init.d/nginx start
Host Setup
These directions assume you are using Linux for your host.
Create a project directory for these tests:
mkdir robot_framework_tutorial
cd robot_framework_tutorial
Virtual Environment Setup
These directions will use python’s venv tool to create a virtual environment for this project. A virtual environment is a self contained installation of python and a selection of libraries. While it isn’t a necessity, there are a couple of reasons why it is the best approach.
- Isolates versions of libraries from other projects on your machine.
- This helps avoid issues such as updating a library for another project and finding out that an API change has broken your tests on this project.
requirements.txt file with a venv is a great approach.- Makes it easier to ensure that environments are more similar across multiple developer’s machines.
- Makes it very simple to setup across those other hosts. You don’t need to capture installation instructions. Each project can just follow the same process and use a different
requirements.txtfile. - Makes it easier to recreate the environment at a later date if reviving an old project.
Creating a virtual environment is incredibly simple.
- Run the following command to create the venv directory
- Run the following command to use the virtual environment
virtualenv venv
source venv/bin/activate
If you run which python, you will see that it points to a python installation in your new venv directory.
Note: If you need to leave the virtual environment just enter the command deactivate
Installing Robot Framework and Libraries
The next steps are the same whether you used the virtual environment or not.
There are a few options for how to do this.
Option 1: Install latest libraries
Generally when you start a new project, you likely just want the latest and greatest of the libraries. This is what we did to start this project out. To install the libraries we need, run the following commands:
pip install robotframework
pip install robotframework-seriallibrary
pip install robotframework-sshlibrary
Option 2: Install specific library versions
In some cases, you want some specific versions. While following this tutorial, you may want to use the versions that were used at the time of writing to avoid API discrepancies. This can be accomplished with the following commands.
pip install robotframework==3.2.1
pip install robotframework-seriallibrary==0.3.1
pip install robotframework-sshlibrary==3.4.0
Option 3: Install specific library versions using a requirements.txt
This accomplishes the same installation as Option 2, but it only requires a single command if you have the requirements.txt file. We created a requirements.txt file when this tutorial was developed by using the following command: pip freeze > requirements.txt. This file has the following contents:
bcrypt==3.1.7
cffi==1.14.0
cryptography==2.9.2
enum34==1.1.10
ipaddress==1.0.23
paramiko==2.7.1
pycparser==2.20
PyNaCl==1.3.0
pyserial==3.4
robotframework==3.2.1
robotframework-seriallibrary==0.3.1
robotframework-sshlibrary==3.4.0
scp==0.13.2
six==1.14.0
Using that file, you can use the following command to install all of the necessary libraries at the same version that we used:
pip install -r requirements.txt
Developing tests
Boot tests
When developing HIL tests, one of the first things you usually need to be able to do is interface with the board’s serial device and verify that it boots correctly. To accomplish this, we create a boot test suite, boot.robot, which utilizes the SerialLibrary.
Settings and variables
First we need to implement our settings and variables:
*** Settings ***
Library           SerialLibrary    encoding=ascii
Library           String
Force Tags        boot    has-serial
Suite Setup       Open Serial Port
Suite Teardown    Close Serial Port

*** Variables ***
${LOGIN_STR}      raspberrypi login:
${SERIAL_PORT}    /dev/ttyUSB0
${RPI_IP}         10.0.1.22
${USERNAME}       pi
${PASSWORD}       raspberry
${PROMPT}         pi@raspberrypi:
We include the Serial Library as that is the interface with which we will be communicating. We also include the String Library since we expect to manipulate some strings.
For the Suite Setup, we call a keyword that will open the serial port to our rpi. For the Suite Teardown, we call another keyword that closes that serial port. I like to use a Force Tags to add a tag to all of the tests within a given test suite file. That gives you more flexibility in how to include/exclude different test cases.
The has-serial tag can be applied to any test that relies on a serial port being available. Not all versions of the RPI have the UART broken out in a convenient way, so this gives you an easy way to disable all of those tests when the interface is not available. For the variables, we define some strings that we need to read and write and the USB device on our Linux host that is connected to the raspberry pi.
Using variables for certain configuration items is very important because you can override them and set them from the command line. So things like username and password can be changed to fit your own credentials and shouldn’t actually be saved in plain-text. Also, if you are running the same tests in different environments, the USB device may get enumerated differently, so you can set that via command line as well.
Most of the other strings are specified as variables because they are used in multiple places, so if it needs to be modified for whatever reason, it only needs to be changed once.
Tests and Keywords
Now it is time to start writing actual tests:
*** Test cases ***
System Boots
    [Timeout]     3m
    Read Until Single    Booting Linux on physical CPU 0x0
    Read Until Single    Mounted root
    Read Until Single    Raspbian
    Read Until Single    ${LOGIN_STR}
    Write Data           \n
    Read Until Single    ${LOGIN_STR}
    Write Data           ${USERNAME}\n
    Read Until Single    Password:
    Write Data           ${PASSWORD}\n
    ${read} =            Read Until Single    ${PROMPT}
    Should Contain       ${read}              ${PROMPT}

Verify RPI IP Address
    [Timeout]     30s
    ${read} =          Run Shell Command    hostname -I
    Should Be Equal    ${read}    ${RPI_IP}

*** Keywords ***
Open Serial Port
    Add Port   ${SERIAL_PORT}
    ...        baudrate=115200
    ...        bytesize=8
    ...        parity=N
    ...        stopbits=1
    ...        timeout=999

Close Serial Port
    Delete All Ports

Read Until Single
    [Arguments]    ${expected}
    ${read} =         Read Until    terminator=${expected}
    Should Contain    ${read}    ${expected}
    Log               ${read}    console=yes
    [Return]       ${read}

Run Shell Command
    [Arguments]    ${command}
    Write Data       ${command}\n
    Read Until       terminator=${command}
    ${result} =      Read Until    terminator=${PROMPT}
    @{words} =       Split String From Right     ${result}    \n    max_split=1
    ${stripped} =    Strip String    ${words}[0]
    Log              ${stripped}    console=yes
    [Return]       ${stripped}
Let’s dissect this a bit.
We will start with the System Boots test case. The items in square brackets [] are test case specific settings. Since it is a boot test, it will just be waiting to read a value. If something goes wrong, then it could wait forever, so we set a test Timeout for 3 minutes.
The rest of the content of that test case makes up the actual test. This test assumes that the board has been manually reset.
A better way to do this is to have an automated power controller which will let you reset via the test case itself. We use the serial library to read from the serial until various boot strings appear to make sure we are running the correct image. We log all of that output to make it easier to debug any boot issues.
After that, we continue to use the serial library to input the username and password and login to the system. We use the Should Contain keyword from the robot framework Builtin library to verify all of our results.
The next test case, Verify RPI IP Address has similar settings, except a much shorter timeout. It is much less likely that this test case would wait indefinitely, however, I think it is a good idea to put in time outs so you never have a test that you need to kill manually. This is very helpful for CI.
This test just runs hostname -I and checks that the output contains the expected IP address. This lets us know that we can run commands and whether follow-up networking tests are using the correct IP address.
On previous projects, I have implemented a couple of keywords that make it easier to do common tasks with serial devices.
Read Until Single reads the serial port until a provided a provided string shows up once. Then it logs that content and returns it. Run Shell Command inputs a provided command and reads until the prompt shows up again. It logs and returns any output from the command that was run.
Running
Now we run our test. It is quite simple with just a single test suite. However, I do like to store my outputs in a results directory. So use the following command:
robot -d results boot.test
Once the test has started, that is when you power cycle your rpi. Then you should get output similar to this:

Refactoring: Abstracting for better looking test cases
While these test cases accomplish our goal, they are not especially easy to read. This can be improved by abstracting similar functionality into keywords. Here is an example of how to make these tests cases much more readable:
*** Test cases ***
System Boots
    [Timeout]     3m
    Check Linux Boots
    Login To Linux

Verify RPI IP Address
    [Timeout]     30s
    Get Host IP
    RPI IP Address Is Correct

*** Keywords ***
Open Serial Port
    Add Port   ${SERIAL_PORT}
    ...        baudrate=115200
    ...        bytesize=8
    ...        parity=N
    ...        stopbits=1
    ...        timeout=999

Close Serial Port
    Delete All Ports

Read Until Single
    [Arguments]    ${expected}
    ${read} =         Read Until    terminator=${expected}
    Should Contain    ${read}    ${expected}
    Log               ${read}    console=yes
    [Return]       ${read}

Run Shell Command
    [Arguments]    ${command}
    Write Data       ${command}\n
    Read Until       terminator=${command}
    ${result} =      Read Until    terminator=${PROMPT}
    @{words} =       Split String From Right     ${result}    \n    max_split=1
    ${stripped} =    Strip String    ${words}[0]
    Log              ${stripped}    console=yes
    [Return]       ${stripped}

Check Linux Boots
    Read Until Single    Booting Linux on physical CPU 0x0
    Read Until Single    Mounted root
    Read Until Single    Raspbian
    Read Until Single    ${LOGIN_STR}

Login To Linux
    Write Data           \n
    Read Until Single    ${LOGIN_STR}
    Write Data           ${USERNAME}\n
    Read Until Single    Password:
    Write Data           ${PASSWORD}\n
    ${read} =            Read Until Single    ${PROMPT}
    Should Contain       ${read}              ${PROMPT}

Get Host IP
    ${HOST_IP} =         Run Shell Command    hostname -I
    Set Test Variable    ${HOST_IP}

RPI IP Address Is Correct
    Should Be Equal    ${HOST_IP}    ${RPI_IP}
This makes the test cases much easier to read at a high level. It also makes the logs look better and easier to read:
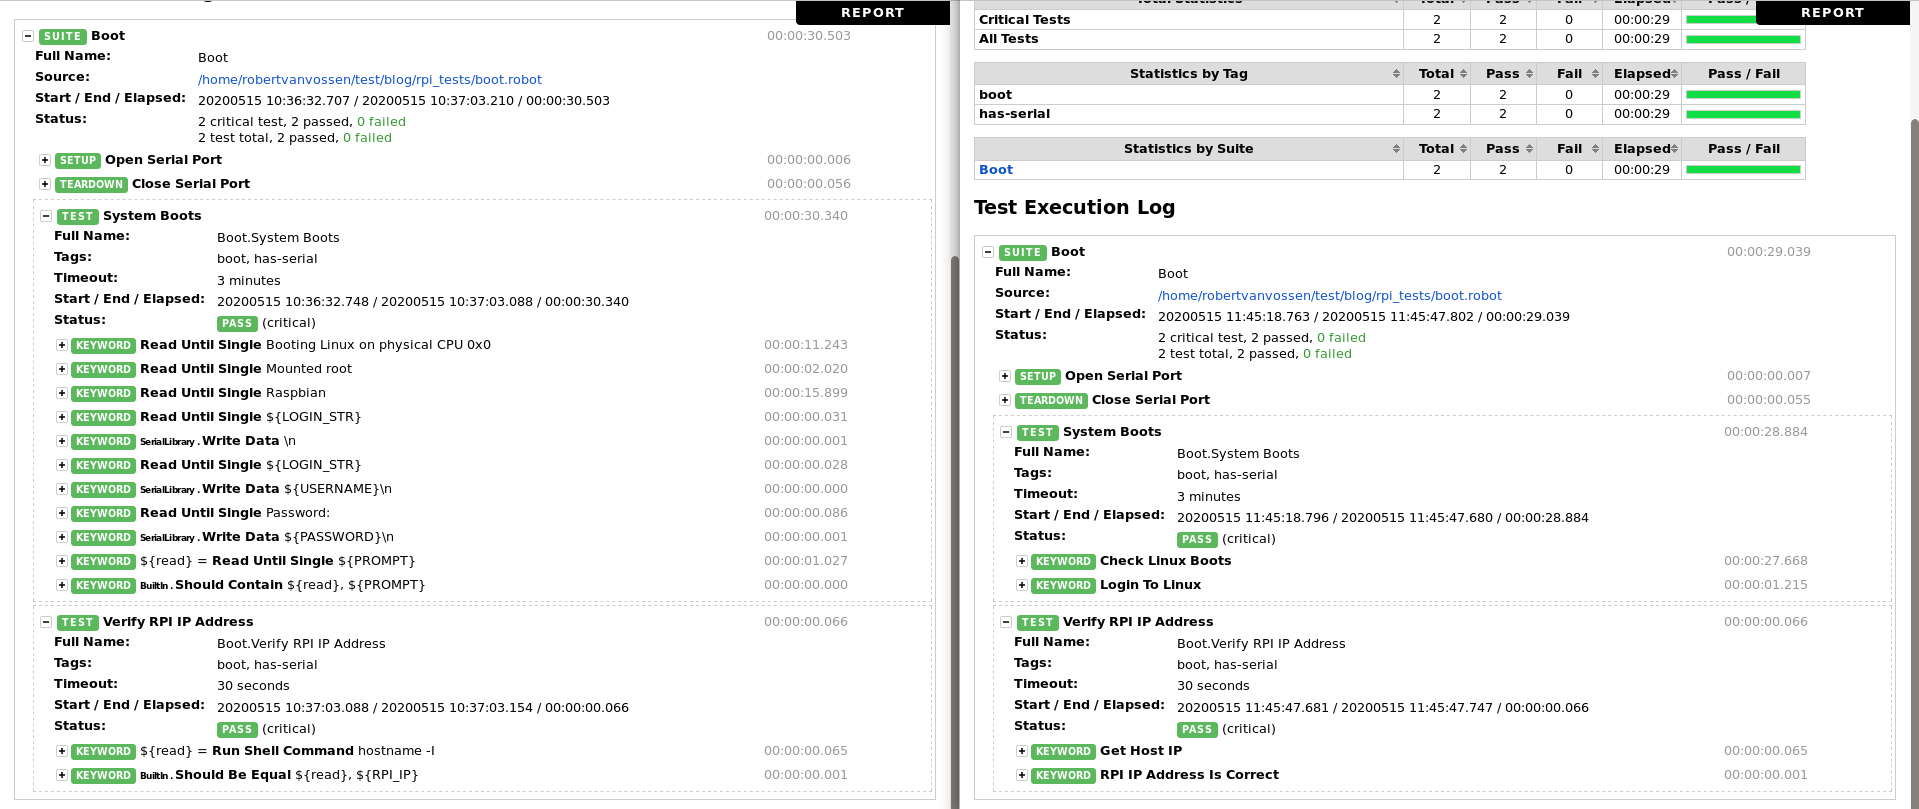
You can still expand each keyword that gets called, but when there is a failure, you can more quickly determine what the test was trying to accomplish when it failed. More tips on writing good test cases can be found here.
Runtime Tests
Now that we can boot the system correctly, we can add some tests that work at runtime.
Webserver Tests
The first test suite we add is indicative of running an application on a target and checking the outputs of that application. We call this test suite webserver.robot as we will be testing an nginx webserver. The new test file looks like this:
*** Settings ***
Library           SSHLibrary
Library           Process
Force Tags        webserver
Suite Setup       Open Connection And Log In
Suite Teardown    Close All Connections

*** Variables ***
${RPI_IP}         10.0.1.22
${USERNAME}       pi
${PASSWORD}       raspberry

*** Test cases ***
Verify Hostname
    [Timeout]    30s
    Get Hostname
    Hostname Is Correct

Verify Nginx
    [Timeout]    1m
    [Documentation]    Nginx is started on boot, so we don't need to start it in the test case.
    Check Nginx Is Running
    Check Nginx Output

*** Keywords ***
Open Connection And Log In
    Open Connection     ${RPI_IP}
    Login    ${USERNAME}    ${PASSWORD}

Get Hostname
    ${HOSTNAME} =      Execute Command    hostname
    Set Test Variable    ${HOSTNAME}

Hostname Is Correct
    Should Be Equal    ${HOSTNAME}    raspberrypi

Check Nginx Is Running
    ${result} =       Execute Command    systemctl status nginx
    Should Contain    ${result}    Active: active (running)

Check Nginx Output
    ${result} =       Run Process    curl    ${RPI_IP}
    Should Contain    ${result.stdout}    Welcome to nginx!
    Should Contain    ${result.stdout}    the nginx web server is successfully installed
The concepts used here are pretty similar to the last test suite. However, we are using the SSHLibrary to communicate with the board over the network instead of using the serial device. We will also use the Process library to run curl to validate the webserver output.
If you are doing a more complicated web server test, you would likely want to use RequestsLibrary, SeleniumLibrary, or RESTinstance. Our Suite Setup opens an ssh connection to the RPI and logs in. The Suite Teardown closes that ssh connection.
Our first test case is a simple sanity check that makes sure that RPI hostname is what we expect it to be. The second test case checks to make sure that nginx is running. Then we use the Process library to run curl and get the output from the webserver. We check those results against some expected results.
In the second test case, we also add some [Documentation]. This lets us add a note to provide some information that is not easy to convey with the test case, keyword, and variable names. This documentation will show up in the generated report.
The SSHLibrary provides mechanisms to easily run commands and get the results. This makes the tests and supporting keywords much simpler to write compared to the SerialLibrary.
Performance Tests
A less intuitive style of tests that is often needed on embedded projects is related to performance. These tests run applications that return performance metrics and check the outputs against some acceptable threshold. We will use sysbench to provide some test results that we can compare. We create a new test suite called performance.robot:
*** Settings ***
Library           SSHLibrary
Library           String
Force Tags        perf
Suite Setup       Open Connection And Log In
Suite Teardown    Close All Connections

*** Variables ***
${RPI_IP}               10.0.1.22
${USERNAME}             pi
${PASSWORD}             raspberry
${EXPECTED_AVG_TIME}    35.00
${EXPECTED_MAX_TIME}    40.00
${PERF_TEST_TIME}       10s
@{SYSBENCH_CMD}         sysbench
...                     --num-threads=4
...                     --test=cpu
...                     --max-time=${PERF_TEST_TIME}
...                     run

*** Test cases ***
Test CPU Performance
    [Timeout]    30s
    Run Sysbench
    Per request average should be less than expected
    Per request maximum should be less than expected

*** Keywords ***
Run Sysbench
    ${cmd} =             Catenate    @{SYSBENCH_CMD}
    ${PERF_RESULTS} =    Execute Command    ${cmd}
    Log                  ${PERF_RESULTS}    console=yes
    Set Test Variable    ${PERF_RESULTS}

Per request average should be less than expected
    ${avg} =          Get Per Request Val    ${PERF_RESULTS}     avg:
    Should Be True    ${avg} < ${EXPECTED_AVG_TIME}

Per request maximum should be less than expected
    ${max} =          Get Per Request Val    ${PERF_RESULTS}     max:
    Should Be True    ${max} < ${EXPECTED_MAX_TIME}

Get Per Request Val
    [Arguments]    ${test_results}    ${val_type}
    ${str} =    Get Lines Containing String    ${test_results}    ${val_type}
    ${str} =    Get Regexp Matches    ${str}    ([\\d\\.]*)ms    1
    ${val} =    Convert To Number    ${str[0]}
    [Return]    ${val}

Open Connection And Log In
    Open Connection     ${RPI_IP}
    Login               ${USERNAME}    ${PASSWORD}
This test suite has a very similar setup to the webserver test. We use the SSHLibrary to run an application on the RPI. Specifically we run sysbench to perform a CPU test. We then use the String library and the Builtin regex capabilities to isolate specific measurements from the sysbench output. Once those are isolated as floats, we can then compare them against the expected thresholds.
If they are too high, then the test fails.
One interesting thing we do for this test is using a list for the sysbench command. We do this because it is an especially long command and this makes it a little more readable.
Refactoring Duplication Out
You may have already noticed some duplicated code between the different test suite files. A good way to deal with this is to use a resources file so multiple test suites can use some of the same variables and keywords. Create a resource.robot with the following:
*** Settings ***
Library           SSHLibrary

*** Variables ***
${RPI_IP}               10.0.1.22
${USERNAME}             pi
${PASSWORD}             raspberry

*** Keywords ***
Open Connection And Log In
    Open Connection     ${RPI_IP}
    Login               ${USERNAME}    ${PASSWORD}
In each test suite, you can now remove the duplicated definition of any of these keywords and variables. Also, in each test suite, you can add the following to the settings:
Resource resource.robot
Multiple resource files can be included by a test suite file. So based on your project, it may make sense for certain test suite files to include specific resource files.
One consequence of this refactoring is that both the SSHLibrary and the SerialLibrary get imported into boot.robot. That wouldn’t be a problem except that they share some names for keywords that we utilize. This means we need to designate which library from which the keyword originates. The updated file looks like this:
*** Settings ***
Library           SerialLibrary    encoding=ascii
Library           String
Resource          resource.robot
Force Tags        boot    has-serial
Suite Setup       Open Serial Port
Suite Teardown    Close Serial Port

*** Variables ***
${LOGIN_STR}      raspberrypi login:
${SERIAL_PORT}    /dev/ttyUSB0
${PROMPT}         pi@raspberrypi:

*** Test cases ***
System Boots
    [Timeout]     3m
    Check Linux Boots
    Login To Linux

Verify RPI IP Address
    [Timeout]     30s
    Get Host IP
    RPI IP Address Is Correct

*** Keywords ***
Open Serial Port
    Add Port   ${SERIAL_PORT}
    ...        baudrate=115200
    ...        bytesize=8
    ...        parity=N
    ...        stopbits=1
    ...        timeout=999

Close Serial Port
    Delete All Ports

Read Until Single
    [Arguments]    ${expected}
    ${read} =         SerialLibrary.Read Until    terminator=${expected}
    Should Contain    ${read}    ${expected}
    Log               ${read}    console=yes
    [Return]       ${read}

Run Shell Command
    [Arguments]    ${command}
    SerialLibrary.Write Data    ${command}\n
    SerialLibrary.Read Until    terminator=${command}
    ${result} =                 SerialLibrary.Read Until    terminator=${PROMPT}
    @{words} =                  Split String From Right     ${result}    \n    max_split=1
    ${stripped} =               Strip String    ${words}[0]
    Log                         ${stripped}    console=yes
    [Return]       ${stripped}

Check Linux Boots
    Read Until Single    Booting Linux on physical CPU 0x0
    Read Until Single    Mounted root
    Read Until Single    Raspbian
    Read Until Single    ${LOGIN_STR}

Login To Linux
    SerialLibrary.Write Data    \n
    Read Until Single           ${LOGIN_STR}
    SerialLibrary.Write Data    ${USERNAME}\n
    Read Until Single           Password:
    SerialLibrary.Write Data    ${PASSWORD}\n
    ${read} =                   Read Until Single    ${PROMPT}
    Should Contain              ${read}              ${PROMPT}

Get Host IP
    ${HOST_IP} =         Run Shell Command    hostname -I
    Set Test Variable    ${HOST_IP}

RPI IP Address Is Correct
    Should Be Equal    ${HOST_IP}    ${RPI_IP}
Further Test Running Considerations
There are quite a few things to consider when running your tests, what you want to run, and how to run them.
Test Ordering
Good testing doesn’t rely on an order for test cases. However, with embedded systems, you might not always be able to assume you are in a powered on state. Or you may have different boot modes or conditions which necessitates boot tests. These boot tests always need to run before you can run anything else. So you likely need to order how you run your tests.
One way to accomplish this is to specifically call out all of the test suites you want to run and what order you want to run them in, for example:
robot -d results boot.robot webserver.robot performance.robot
Another way to accomplish this is to make multiple calls. For example:
robot -T -d results boot.robot
robot -T -d results -e boot .
rebot -d results results/*.xml
In this example, we run the tests in boot.robot first. Then we make a second call to run all of the tests that are not tagged boot. The -T argument adds a timestamp to the output filenames. That way we can use the same results folder for multiple calls. The -e boot argument is what excludes the tests with the boot tag.
The final command takes all of the xml result files that are produced in the results directory and combines them into a single report. While this approach is more complicated, it can give you some more flexibility.
Running Specific Tests
Often times, you only want to run specific tests as you develop code and new tests. This can be done in multiple ways. You can specify which test suites you want to run, which is mostly what we have described up to this point. For example:
robot -d results webserver.robot
You can also specify specific test cases as arguments, for example:
robot -d results -t "Verify Nginx" -t "Test CPU Performance" .
Another method is excluding/including tests based on tags. We have shown how to exlude based on tags. Here is an example on how to include based on tags:
robot -d results -i webserver .
Given our example project, this isn’t any different than just running based on the test suite. However, it may make sense to apply the same tag to certain test cases across different suites. For one customer, we needed more than just basic functional testing. We also needed to show that the system continued to function correctly while being in use for a couple of days.
To accomplish this, we tagged certain tests as periodic and then we wrote a script that would run all of the periodic tests every half hour.
Scripting
As shown in the last example, scripting the running of your tests can be incredibly useful to meet customer needs. Robot Framework makes that incredibly easy by providing the robot module. This provides the same functionality as the robot tool that we have been describing, but as a module that you can import in a python script. Then you can do much more complicated things while still just making a simple call or two.
Criticality
By default, all tests are configured as critical tests. However, you may have some tests that are non-critical, i.e. they don’t affect the overall pass/fail results. Tests cannot be specified as critical or non-critical in the test suites themselves. It must be specified on the command line.
Here is an example where we want to know the results of all of our tests, but we don’t want the performance tests to be critical:
robot -d results -n perf boot.robot webserver.robot performance.robot
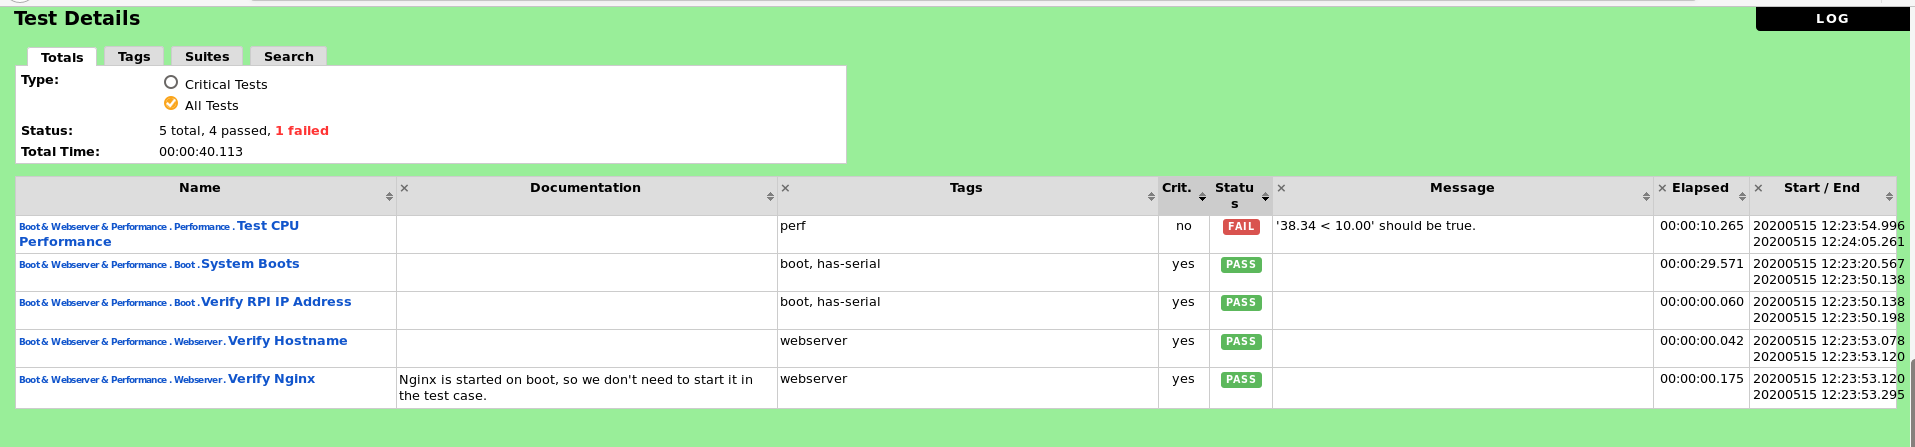
I modified a performance threshold value to demonstrate the non-critical failure. Here are the results:

Report:
If you want to reduce the risk involved in developing technical products, DornerWorks engineers can help you achieve that confidence with automated testing. Schedule a meeting with our team today and we will help you plan out a solution that meets your goals.
Visit Our Site